How to Set Up a Custom Short URL for Your Personal Blog
Thank you so much for all the love yesterday with the launch of this new site! (Read about it here.) One of my favorite new features under this self-title brand umbrella is the custom branded short link (tarynwil.li) you might have spotted on Facebook or Twitter.
URL shorteners are critical to promoting what you’re doing on social media. They shorten long links, obviously, but they also let you track who clicks on which links and when. Tracking your links is a great way to monitor your social media presence as a blogger or small business owner. And if you’re really going for the gold, you might also want to claim a custom branded short link.

Branded short links help drive brand recognition, making sure that you don’t sacrifice familiarity and trust for a short URL. There’s also a bit of credibility involved. When the New York Times shares a nyti.ms link, they’re presenting a consistent, professional brand across all their social media channels. The good news is you don’t need to be the New York Times to have a custom short URL. If you run a personal blog, all you need is about $20.
There are plenty of tutorials out there about how to set up a custom short URL. But I found an easy way to set up a custom short URL for your blog using iwantmyname. They have a really simple setup that works seamlessly with Bitly, so you don’t need to mess with DNS settings or any other technical jumbo to get it done. Here’s how it works:
1. Sign up for Bitly.
If you don’t already have a Bitly account, register on the site.
2. Choose your short URL domain.
You want something short (shoot for fewer than 15 characters), but that still resembles your brand and/or your main web address. Go for a short version of your name, followed my .co, .me or .it in place of .com. That’s what AdWeek did for adweek.it, and Pandora for pdora.co. If you can make it work, go for a domain hack, which is when you use domain extensions like .es or .io to create words or phrases out of domain names. You might have to cut out vowels or or parts of words; but if you can see or pronounce your brand from the short url (like “nyti.ms”) you’re in great shape.
If you’re having trouble coming up with a good short URL, check out domainr.com. You can type in your name or brand and let Domainr help you find an available address.
3. Regsiter your URL & set up the Bitly app.
Visit iwantmyname and register your new domain. It could cost anywhere from $10-$50, depending on the top-level domain (my tarynwil.li URL was $35 using .li, the TLD from Lichtenstein). Once you complete the checkout process, visit the marketplace and follow the steps to install Bitly at your new domain.
4. Register your short URL on Bitly.
Visit the Settings page of your Bitly account, and click on the Advanced tab to add your custom short domain. Setup is really simple from here, and you won’t need to mess with any DNS settings or anything else too techy, since iwantmyname already did it for you. (Before you click “verify,” make sure you’ve already installed Bitly a your custom domain through the Apps & Services marketplace on iwantmyname).
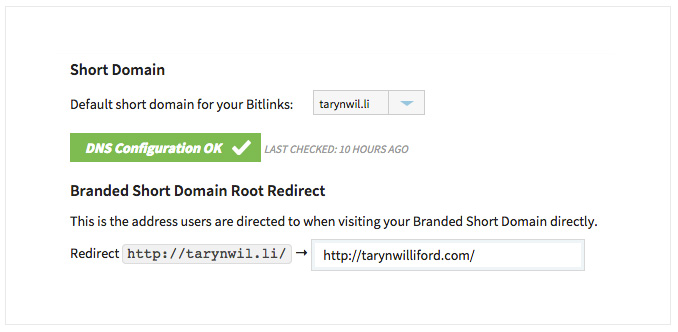
It might take some time to get everything working together in the back end, but Bitly will tell you when it’s ready by displaying your new URL in the short domain drop-down menu. Don’t forget to set your branded short URL’s redirect to your normal homepage (like how tarynwil.li points to tarynwilliford.com).

Simple, right? Now you’re free to go on shortening links for easy sharing on Twitter and Facebook, only now, you’re looking hella professional. For less than the cost of a dinner out. You marketing genius, you.

